How to use
Learn the ins and outs of Dorado – from its basic functionality to advanced routing practices
Quick Start Guide
Here’s how to use Dorado in its most basic form – create your boat and your first route
Here’s how to use Dorado in its most basic form – create your boat and your first route
While Dorado offers a host of powerful weather and routing features for seasoned sailors, you can still get a lot out of it even when using the platform in its most basic form. Let’s go over the first steps you need to take after registering to get started.
1. Create your boat
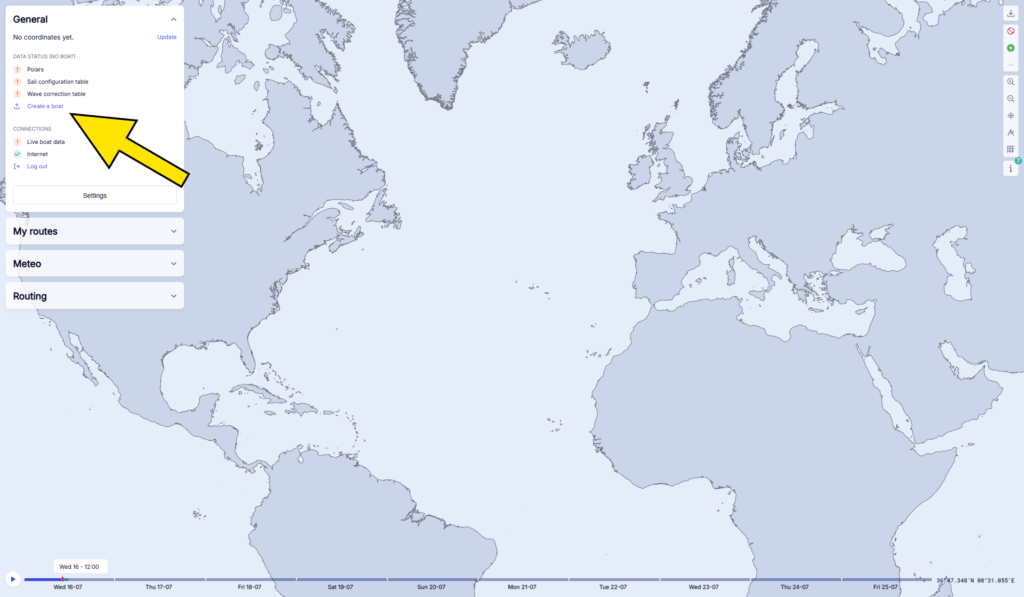
After logging into your Dorado account, you’ll find yourself on the world map. The very first thing you should do is create your boat. Expand the General menu and click Create a boat.
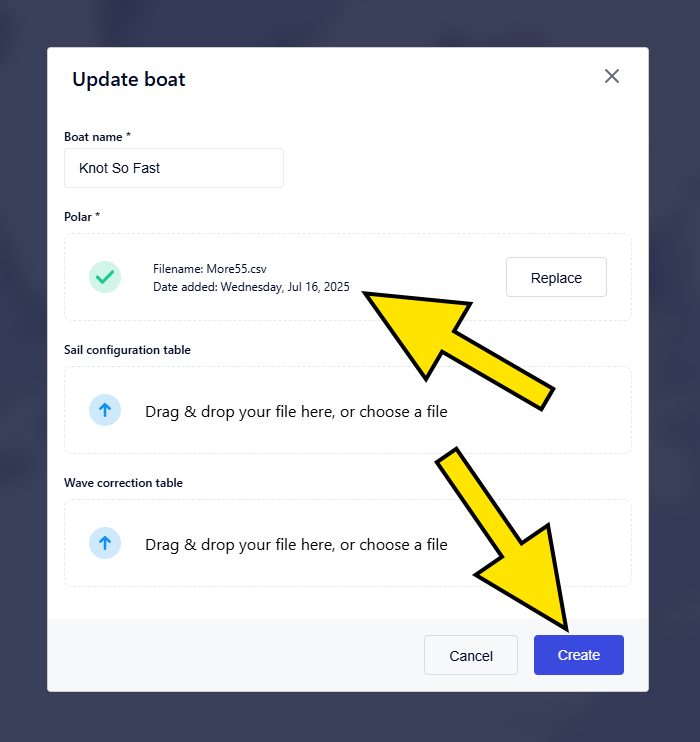
Name your boat and upload its polars, either by dragging the appropriate file onto the Polar field or by selecting it from your computer. All standard polar diagram formats are accepted – CSV, POL, TXT, TCS, XLS, XLSX, and XML. Once done, finish creating your boat by clicking Create.
If you don’t actually own a boat and just want to explore Dorado, you’re welcome to use any publicly available boat polars, which can be found on sailing websites and community forums.
Unless you’re a professional sailor, you don’t need to worry about sail configuration tables and/or wave correction tables. These are advanced components used in performance sailing, whose purpose is to enhance the accuracy of polar performance models by accounting for real-world factors that affect boat speed and optimal sail choices.
2. Choose a route
To create your first route, find the desired starting point on the world map, right-click on it, and select Routing from here. Then find your destination, right-click on it, and select Routing to here.
Alternatively, you can right-click on any part of the world map and select Set my boat position here. If you then right-click on your desired destination and select Routing to here, we’ll automatically create a route from your boat’s location to the designated destination.
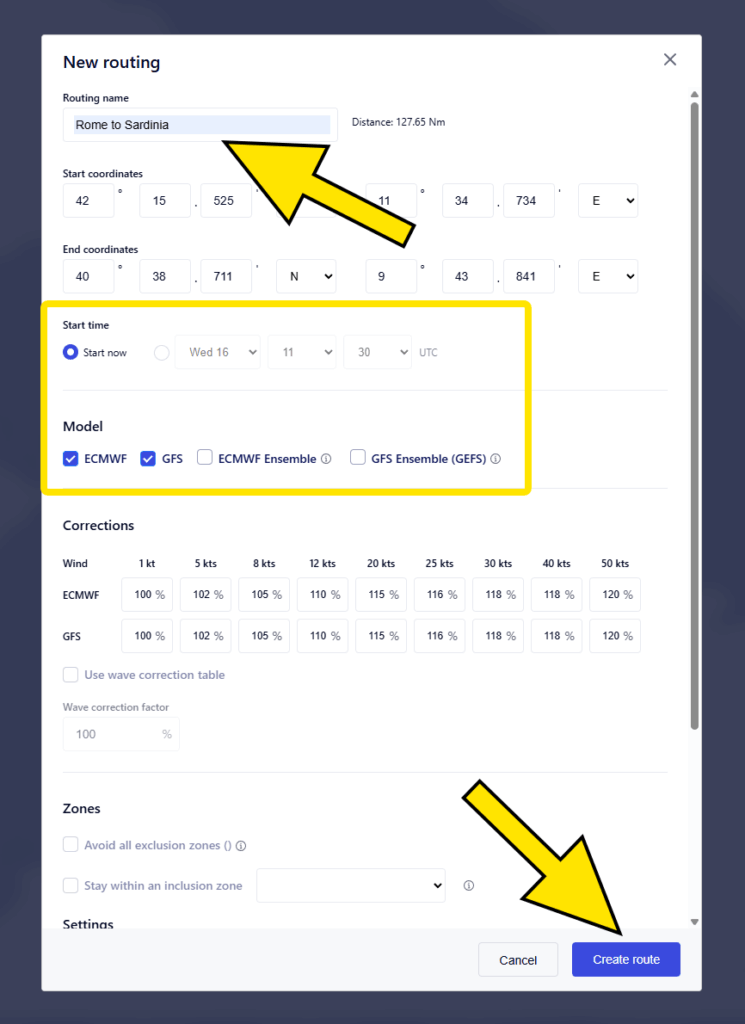
Give your route a name. It’s a good idea to give it a descriptive name instead of a generic one, as that makes your experience much more intuitive when dealing with multiple routes down the road.
There are a lot of variables you can configure when adding a route, but first-time users can stick to the basics – the Start time and Model. The Start time defines exactly that – the exact date and time when you’re looking to start your voyage. The Model refers to the meteorological model you want to utilize. Dorado supports ECMWF and GFS weather prediction models, including both deterministic and ensemble variants. You’re welcome to select any preferred combination of models, including all of them. Once done, start processing your route by clicking Create route.
At the bottom of the New routing window, you’ll find two options that can make your journey much more to your liking: wind speed limit and wave height limit. Adjust those to your preference, and the route will be configured in a way that keeps you within your comfort zone.
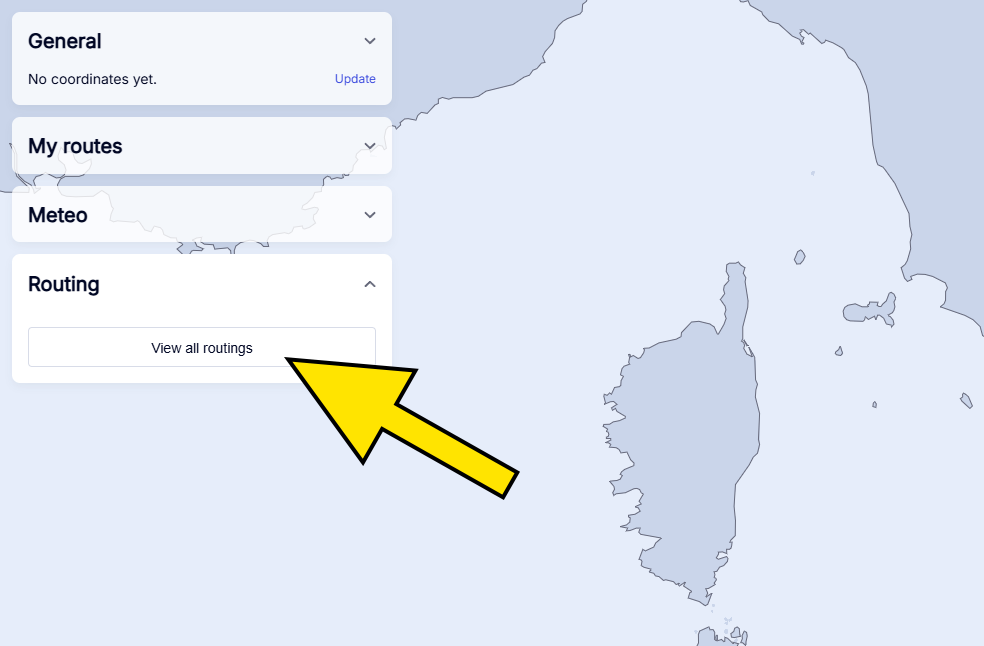
Your route will now be processed and prepared for download. To see its status, expand the Routing menu and click View all routings.
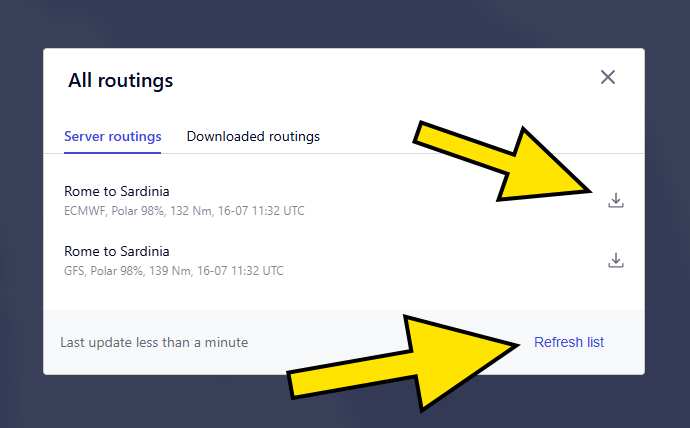
To get your route to show up, click Refresh list at the bottom of the window. Once it’s done processing, you’ll see a Download button next to its name. Click on it to add the route to the Routing menu.
3. View your route
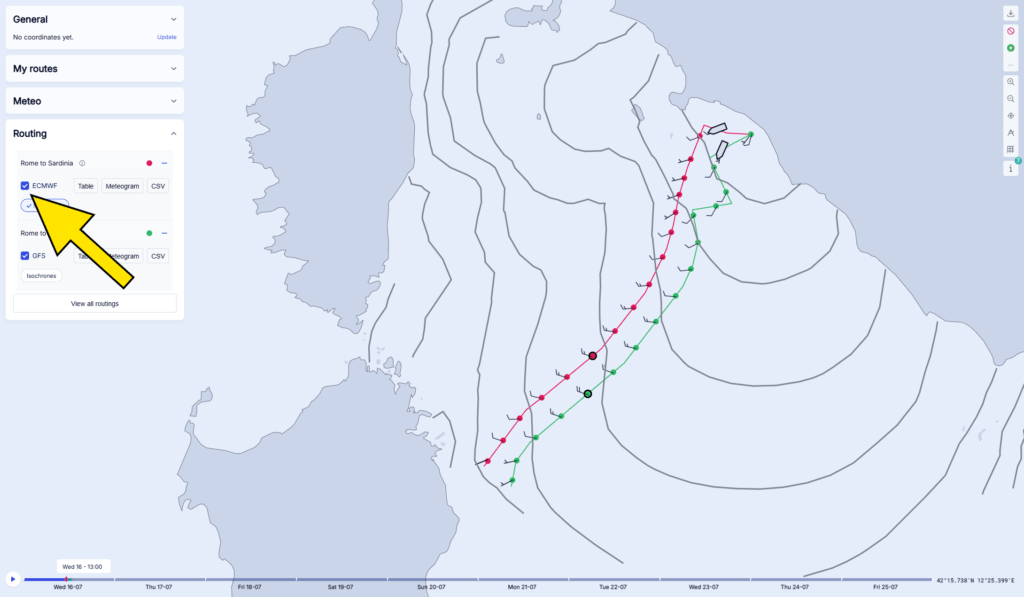
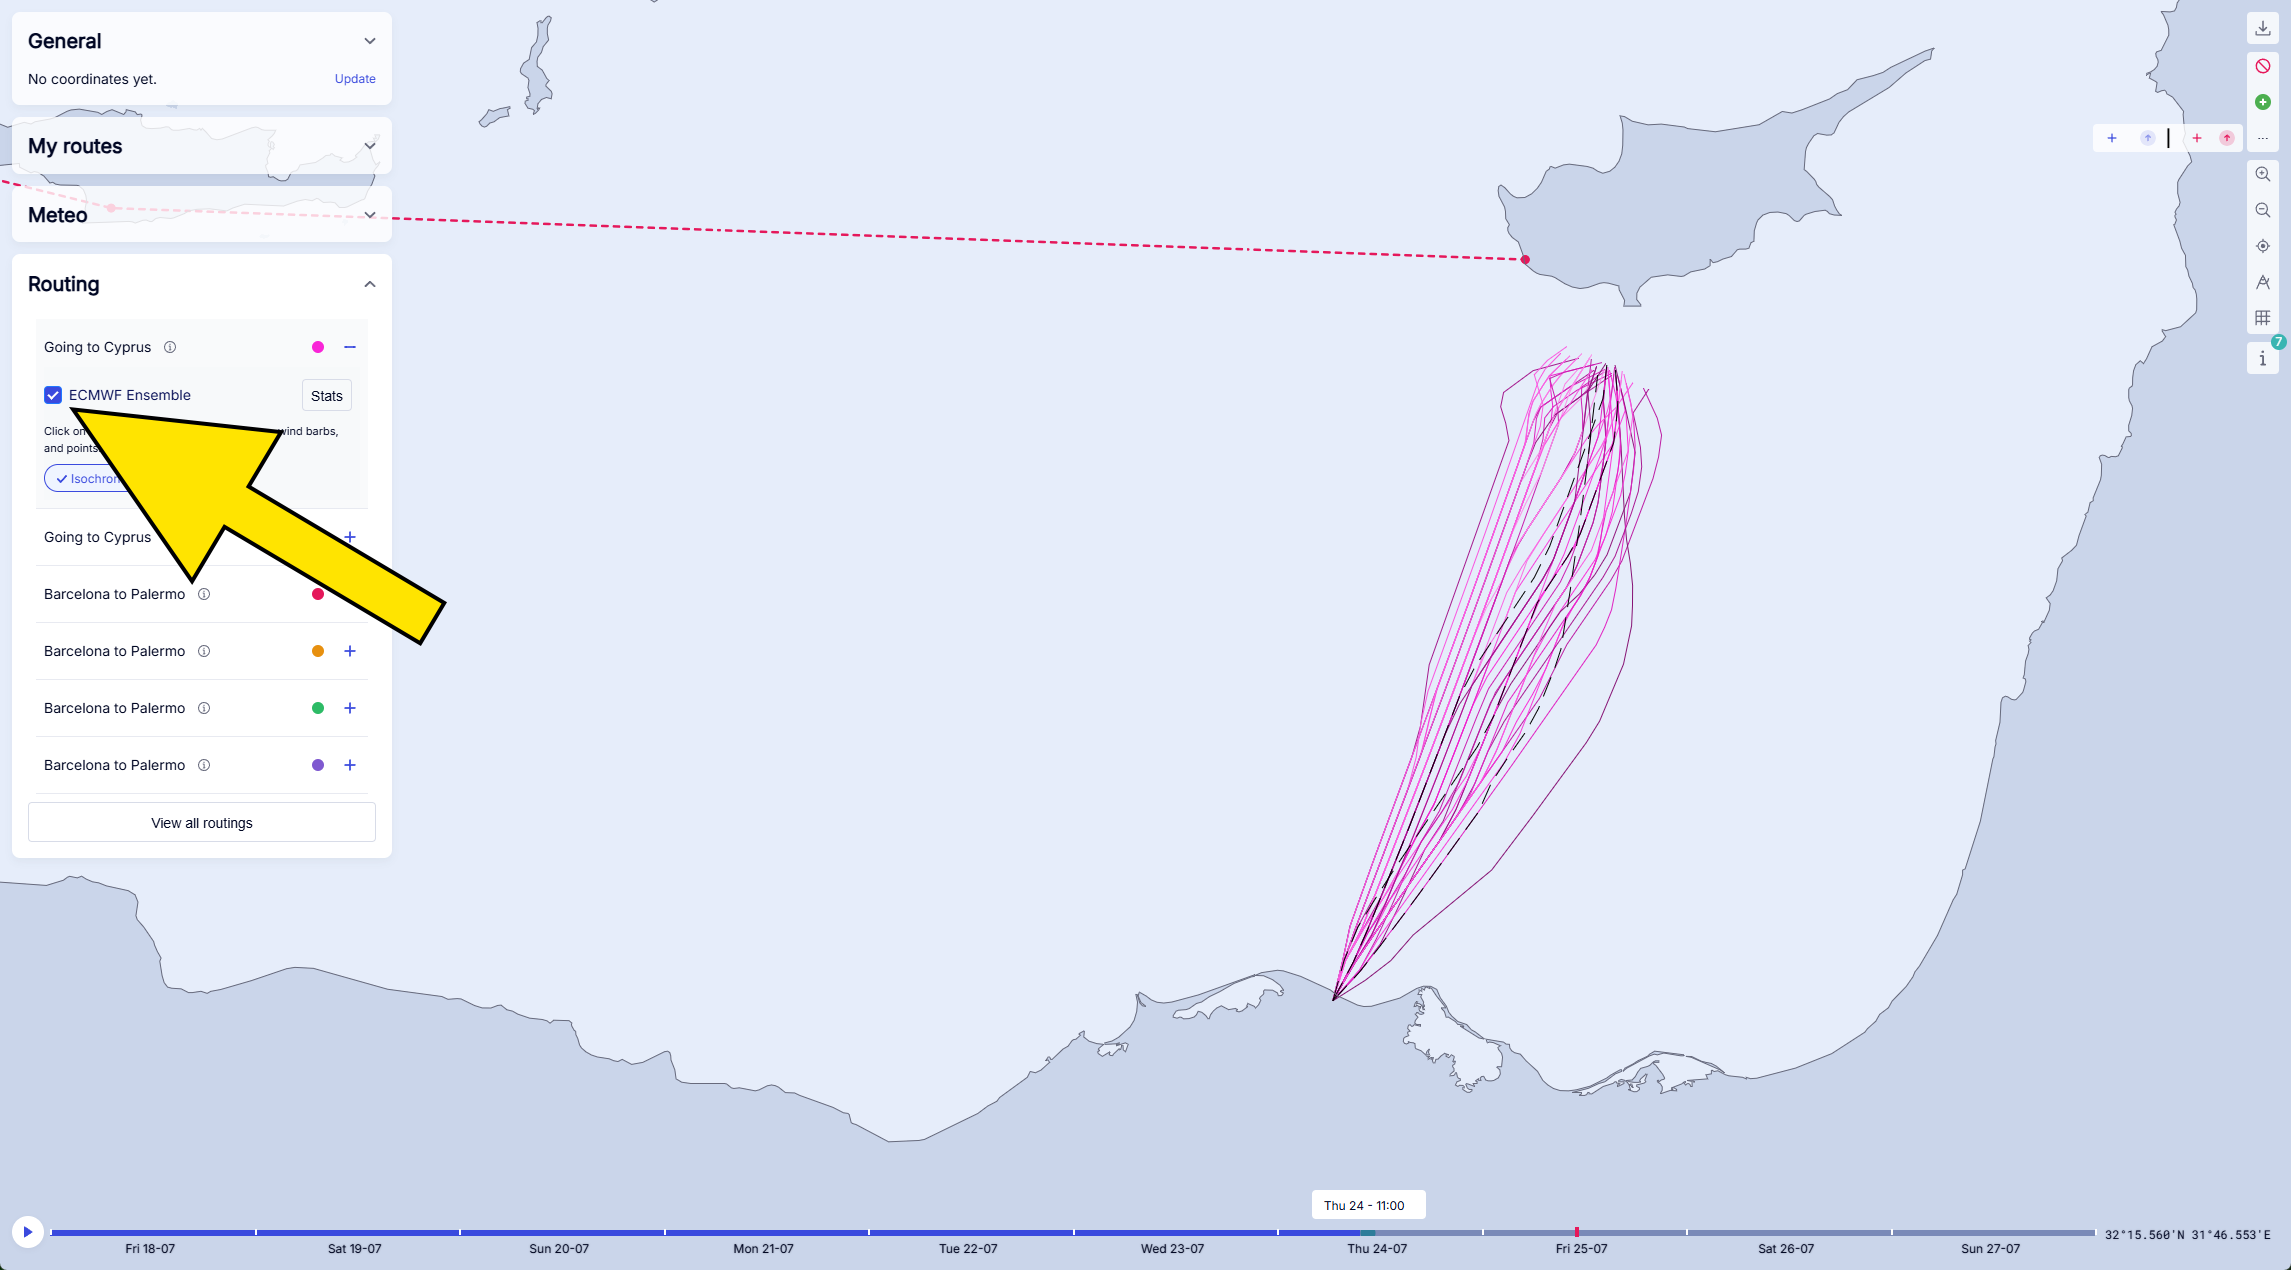
Look for your downloaded routes in the Routing menu and tick the box next to the weather model you want to observe the route for. You can do this for multiple weather models at once if you want to compare the suggested routes directly.
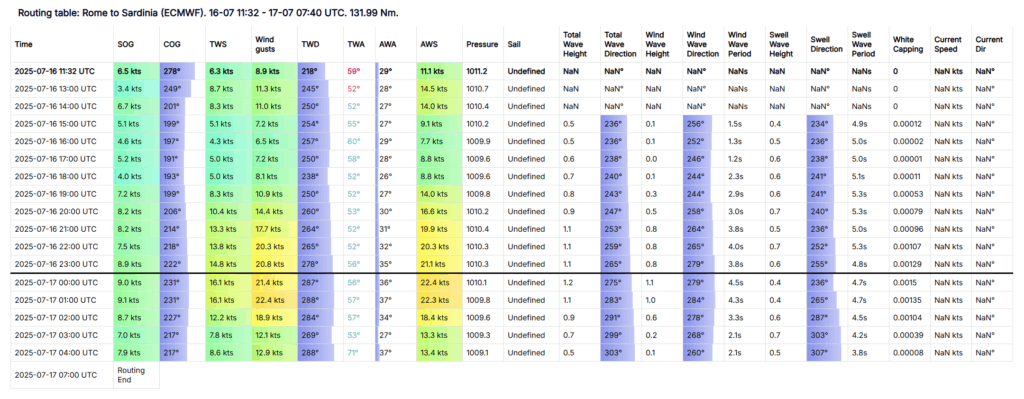
All downloaded routes come with detailed weather routing tables and meteograms, which you can access by clicking the Table and Meteogram buttons next to the model name. You can also toggle isochrones for your route, giving you a clear visual indication of the calculated duration of your voyage. Each weather model comes with its own predicted isochrones, so make sure they are activated for the model you plan to use.
Downloading and adding routings
Find out how to process, download, and activate your sailing routes
Find out how to process, download, and activate your sailing routes
Routing is at the heart of Dorado. After you determine your starting point and destination, Dorado calculates the optimal path based on real-world data — including weather models, wind, and waves. Your routings are first processed in the cloud, after which you need to download them to add them to your Routing list, where they become available for use.
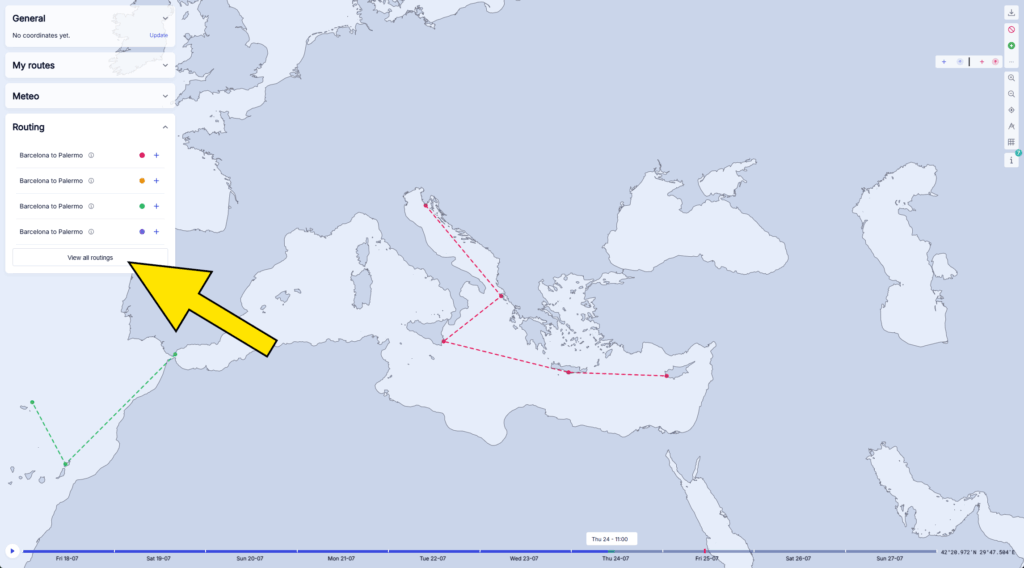
Whenever you create a new routing, you can find it in the Routing menu. Your added routings will appear once you expand the menu. To check the status of your newly created routings, click the View all routings button.
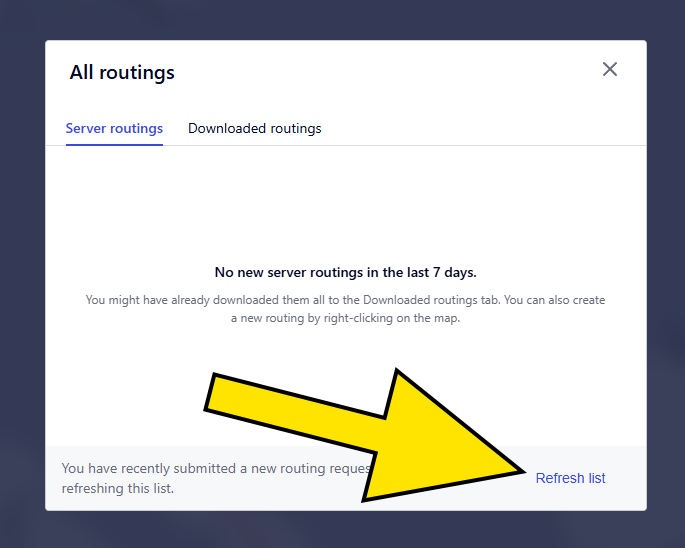
To see routings that are being processed or are ready for download, click Refresh list. If a routing is still being processed, you’ll see the Processing… label next to it. Wait a moment, then click Refresh list again to update its status.

The Download button, found next to each of your routings, indicates that they’ve finished processing and are ready for download. Click the Download button next to each routing you want to add to your Routings list, then close the window.
Look for your downloaded routings in the Routing menu. To display one on the world map, expand the desired routing and tick the box next to the weather model you want to use to view the optimal route.
In the All routings menu (expand Routing and click View all routings), you can delete routings that are currently being processed or are ready for download by hovering your mouse over them and clicking the trash can icon. In the Downloaded routings tab, found in the same menu, you can do the same for each downloaded routing — or simply toggle them off if you don’t need them at the moment but plan to use them later. This helps keep your Routing list clutter-free.
Types of meteorological data (and how to use them)
Learn about the differences between deterministic and ensemble weather models, and how to use both in Dorado
Learn about the differences between deterministic and ensemble weather models, and how to use both in Dorado
With weather being an essential element of sailing, Dorado supports two of the most widely used global weather forecasting models: ECMWF (European Centre for Medium-Range Weather Forecasts) and GFS (Global Forecast System). Both come with their pros and cons, and we’re not here to tell you to use one over the other. Instead, when planning a route, you can simply select both and directly compare the resulting optimal sailing routes.
Aside from the regular (deterministic) variants of the ECMWF and GFS weather forecast models, you can opt to use their ensemble variants – ECMWF Ensemble and GFS Ensemble. Ensemble models essentially run multiple simulations of the same weather model, but with slightly different starting conditions, to account for various inaccuracies in deterministic weather models and the chaotic nature of Earth’s atmosphere. In exact numbers, the ECMWF Ensemble performs 50 different weather simulations, and your route will be computed for each of those simulations. The GFS Ensemble performs 30 simulations.
Choosing a sailing route when using ensemble models is certainly more complex compared to deterministic models, but in return, you generally get higher accuracy, especially over long ranges, and a clearer understanding of potential risks – all with the goal of making better routing decisions.
Choosing and downloading the weather model(s)
To choose the weather model(s) you want to use for your route, create a new route and tick the boxes next to the preferred models. You can select as many as you’d like – including all of them. As soon as you click Create route, your routes and weather models will begin processing. Look for your routes and selected weather models in the Routing menu. They might take a while to process, depending on the length of your route – just sit tight.
Once the routes and weather models are done processing, click the corresponding Download buttons to import them into the Routing menu.
Using weather model(s)
In the Routing menu, tick the boxes next to the weather models you want to use to get an ideal sailing route for each of them. Ensemble models will yield multiple routes. By clicking on different routes, you can view the corresponding isochrones, wind barbs, and points.
Wind barbs provide a visual representation of wind speed and direction. The lines indicate the direction the wind is coming from, while the barbs represent wind speed. A short barb equals 5 knots, a long barb equals 10 knots, and a triangle represents 50 knots.
The points reflect the best possible position your boat could reach in an hour of sailing.
When using ensemble weather forecast models, if the lines are clustered together, that mans that the forecast is high-confidence, all simulations agree on the general wind pattern, and the route is likely to hold. When the lines are widely spread, that indicates a low-confidence forecast and significant uncertainty in wind direction and strength. Keep that in mind when planing your route.
Downloading meteorological visualizations (for any part of the map)
Instead of reading meteograms, you can get a visualization of various weather conditions along your route or for any other chosen part of the world. This includes factors such as wind speed, wind direction and gusts, atmospheric pressure, wave height, wave direction, whitecapping, and more.
To do so, expand the Meteo menu and click Download meteo visualizations. Then simply drag a box across the area you want to download the weather visualizations for, and click Confirm.
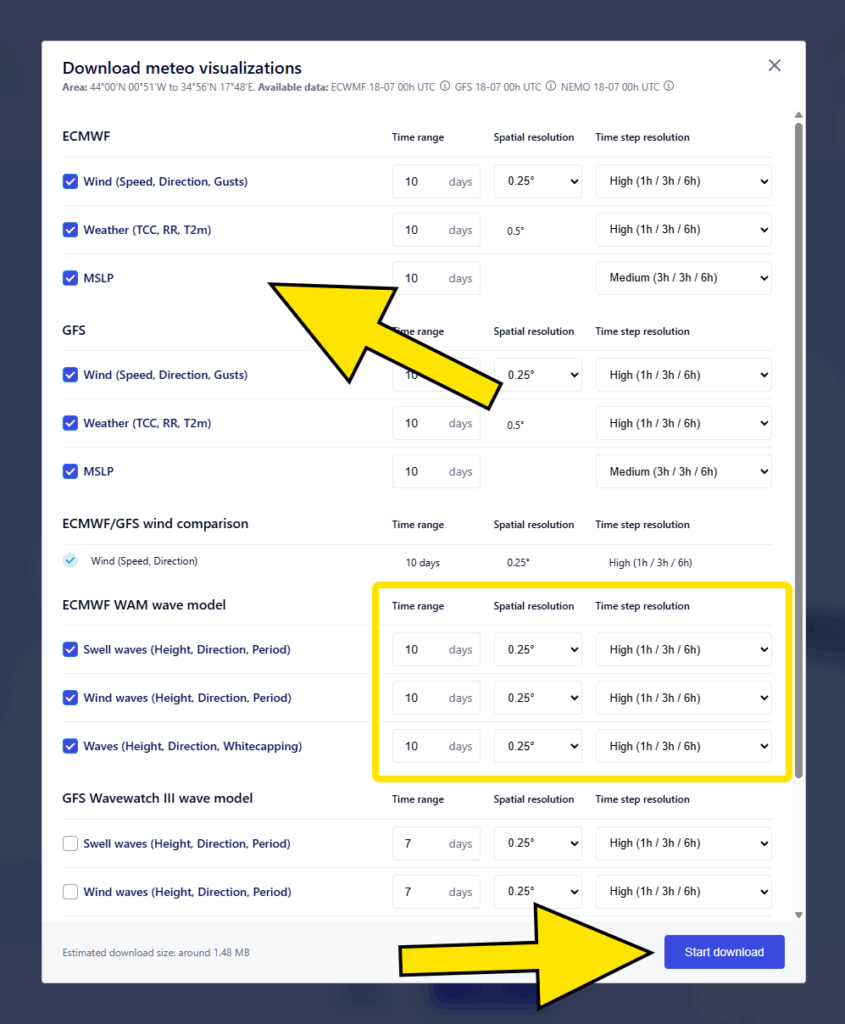
On the following screen, select the weather visualizations you want to download, the number of forecast days (Time range), the distance between grid points in the model (Spatial resolution), and how often the selected model provides data points (Time step resolution). Once you’re happy with your selection, click Start download and wait for the data to be downloaded. Please be patient – even if the download seemingly hangs, you usually just have to wait for a couple of moments for it to complete.
Visit the Meteo menu to access and observe the downloaded data. Simply expand the models you’ve downloaded data for and click on Visualizations to display them in the selected area.
Aside from individual visualizations for ECMWF and GFS weather models, you can gain valuable insight into your upcoming journey by analyzing elements like wave swell height and whitecapping (found under the ECMWF WAM wave model). Also useful is the ECMWF/GFS wind comparison visualization, which gives you an instant overview of how closely the ECMWF and GFS weather models align in their forecasts within the selected area.
Creating personal routes
Keep your favorite sailing routes within easy reach
Keep your favorite sailing routes within easy reach
If you have one or more favorite sailing routes, Dorado enables you to add them to your My routes list, so you can quickly generate weather forecasts for those routes every time you decide to take them. These can be point-to-point or multipoint routes, and you can even switch between the two after creating a route. Here’s how it all works.
Create a personal route by expanding the My routes menu and clicking New route. Select the starting point and any number of preferred waypoints. You can freely move the waypoints by dragging them to a new position. To remove the most recently added waypoint, simply click Undo. Once you’re happy with your selection, click Confirm.
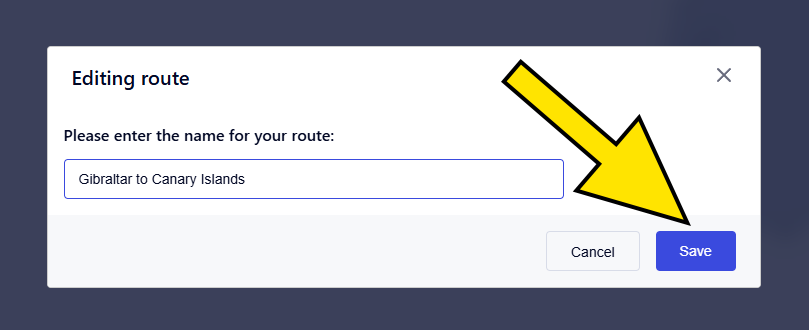
Give your route a name and click Save.
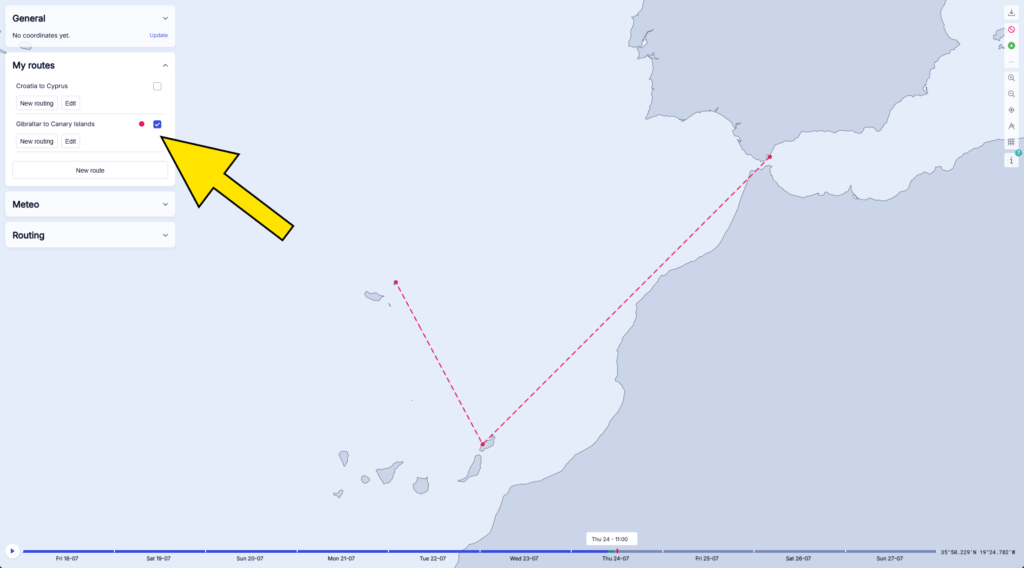
Look for your route in the My routes menu. To enable it, tick the box next to its name. From here, you have two options: New routing generates the weather forecast model(s) for your route, and Edit lets you adjust or remove waypoints, or delete the route altogether.
After you’ve added your personal route, creating weather models for it, as well as using different routing options, works exactly the same as explained in the Quick Start Guide at the top of this page. You’ll go through the same process of configuring routing parameters (start time, preferred weather models, optional wind corrections, wind and wave height limits, etc.), downloading the processed routes, and accessing them via the Routing menu. A detailed overview of the routing adding process is available in the Downloading and adding routings article at the top of this page.
Inclusion and exclusion zones
Define where your route should go – or never go
Define where your route should go – or never go
When creating new routings, you can limit them by adding inclusion and exclusion zones, which shape the routing algorithm to respect your strategic and safety preferences. The difference between them is straightforward:
- Inclusion zones are areas you explicitly want to route through — such as regions with better wind, favorable currents, or even scenic value.
- Exclusion zones are regions you want to completely avoid — like ice fields, busy shipping lanes, or areas with geopolitical instability.
Dorado allows you to upload inclusion and exclusion zones via a GeoJSON file, or you can add them manually.
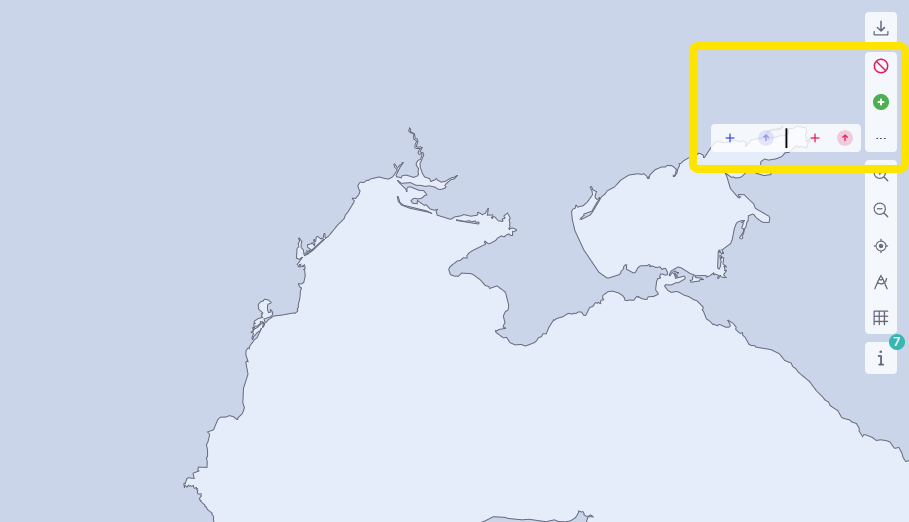
To add an inclusion or exclusion zone, use the appropriate toolbar buttons on the right-hand side of the interface. You can toggle the created zones on or off as needed. Clicking the three dots reveals options to upload GeoJSON files or manually add both types of zones.
Zones can be added by drawing polygons anywhere on the map. This must be done before creating a new routing, as that’s the only way to ensure the inclusion and exclusion zones are factored into the routing calculation.
You can edit inclusion and exclusion zones by selecting them, clicking Edit, and then dragging the corners to the desired new position.
Here’s a concrete example of creating and using an inclusion zone. We’re starting with a previously added personal sailing route from Croatia to Cyprus. Let’s pretend our goal is to ensure that the routing doesn’t take us too close to Turkey or Africa.
First, expand the three-dot menu and click the blue “+” symbol to begin creating an inclusion zone. Then, simply draw a polygon over the desired area by clicking on specific points on the map. You can drag the corners of the polygon to fine-tune its shape if needed. When you’re satisfied with the inclusion zone, click Confirm.
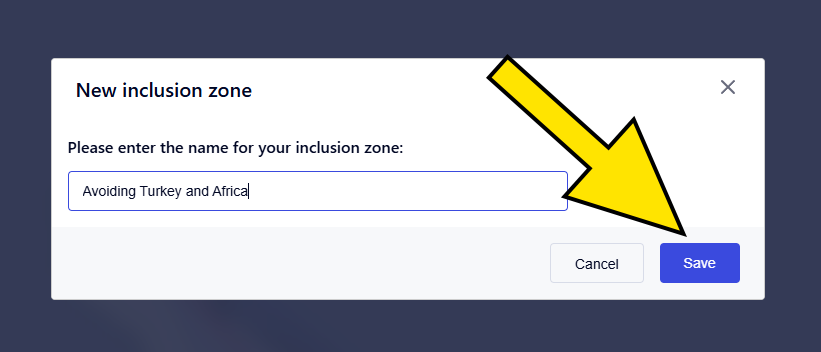
Come up with a name for your inclusion zone and click Save.
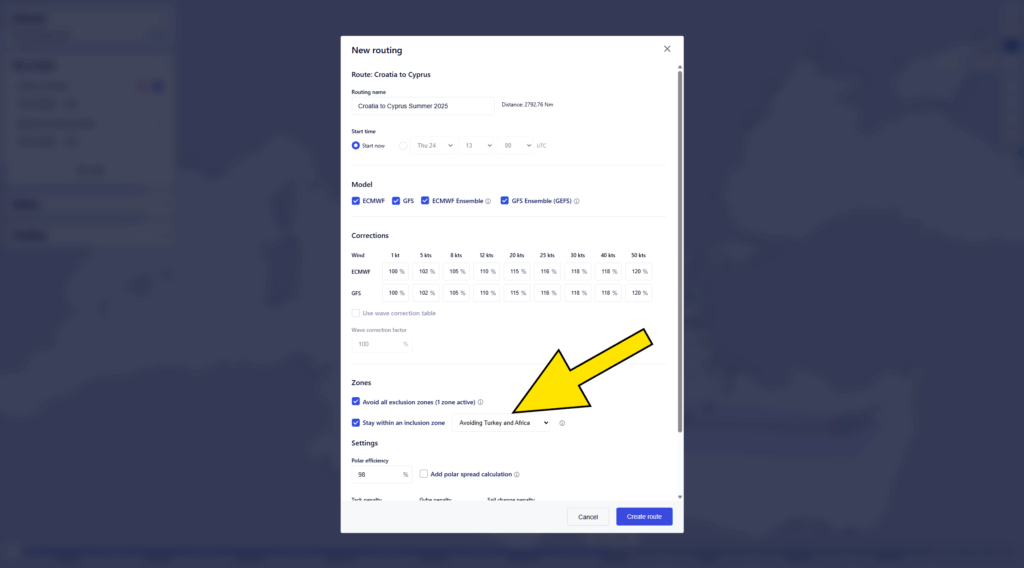
Next, we have to expand the My routes menu, look for our route and click the New routing button below it. Finally, in the new routing window we have to tick the box next to the Stay within an inclusion zone option and select the name of the desired inclusion zone from the dropdown menu.
After we select the weather models, give our routing a name and confirm everything by clicking Create route, our processed and downloaded routings will stay strictly within the selected inclusion zone.
To learn about the process of downloading and adding routings, please refer to the Downloading and adding routings article at the top of this page.